The dining room table was moved to our eat-in-kitchen area that was previously empty, awkward, and a waste of space.

And I'm not sure you can call this "progress" exactly, but it was definitely a step in the right direction for us!
I threw together a design board (one of which I have strayed majorly from and hope to do an updated version a.s.a.p!) and put on my creativity cap. One peacock blue desk, chevron wall, and bamboo chair later...and we are truckin' right along.
Now, this isn't my first time at the rodeo (remember my wall-o-shelves and gallery wall in the living room), but it was definitely a much larger project this time around. I started just like last time--cutting out newspaper silhouettes for wall placement help later on.

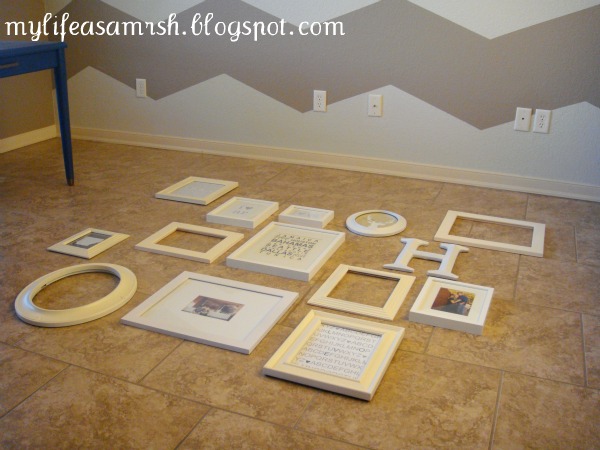
Next, time to lay them out like you want them on the wall! Since this wall was really large and I had 14 frames, I started with the five frames I wanted to highlight (and they were 5 of the biggest) and placed them in the shape of a W. This helps spread out your large frames (so you don't end up with them all on one side and all the small frames on the other) and the different frame styles. Notice I have a matted, open-back, oval, and a couple unmatted frames making up my W.

1. Make sure your like-frames are spread throughout.
2. Make sure your pictures and art in the frames are spread throughout (you don't want all of your pictures on one side of the wall and all of your printables on the other)
3. If you have unique items, in this case I have an "H" and antlers on the way (not pictured), make sure those items are spread apart as well.
4. Don't spread the items/frames too far apart. When they are too far apart from each other, the wall no longer looks like a whole...just a lot of pieces!
All of these things help weight your wall evenly while the original W shape sets the foundation.

I ended up doing a little switcharoo near the bottom and placed a white sheet of paper as a stand in for my antlers.
Now, here she is in all of her gallery wall glory:


Even though it cuts out the top few items, this is my favorite pic since the chandy is no where in sight. I'm saving my pennies and have my eyes on the perfect pendant!
I may still add a few things to either side (especially since my West Elm antlers ended up sticking out more than up like in the online pics), but I'm happy for the moment and ready to move onto other things...like my DIY pinboard you can see there on the right. I'm currently in the middle of adding the nailhead trim and hope to show my how-to next week! Other changes to the office included repainting my previously oil rubbed bronze desk hardware to an antiqued brass. The ORB was just too dark and the desk screamed the need for brass hardware with its mid century modern style! Paired with the bamboo chair, it's a match made in office heaven!
Still to do:
1. Chevron Wall2. Desk
3. Gallery Wall
4. Rug (or steal the one from the living room and replace that one?)
5. New overhead light fixture (pendant)
6. Curtains-->just picked these up...gotta get a rod though!
7. DIY Inspiration Pinboard
8. Add storage (open shelves? industrial shelving unit? floating cabinets?)
9. Chair
10. Cute accessories to hold my desk goodies
I'll be linking to these lovely parties: