TGIF!! Well, the office got a little addition this week:
Helloooooo mail center! Loving my $13 TJ Maxx find! Oh, and I'm saving my pennies for this bad boy:
...and these chairs:
Oooo I can't wait! Happy Weekend!!
TGIF! It's been a busy week...which means I've got a little something to finally show off today! I started this project here, when I realized I needed to run my business out of an office--not a cardboard box (or 3). Clearly I needed storage and despite the beautiful shelving units I had spotted, I couldn't bear to cough up the sticker price. When on a budget...DIY!
I gathered my supplies, sanded my boards (first with 80 grit, then 220 grit sandpaper), stained them, then decided how much room I wanted between each shelf. Twenty inches ended up being the perfect measurement. It was all gravy from there:
PROGRESS SHOTS VIA INSTAGRAM
And the final result:
And because we all love a good before and after shot:
BEFORE:
AFTER:
I couldn't be happier!!
Now for the breakdown:
Wood Shelves (precut) $40
Stain and Poly Coat in 1 $10
Brackets $13
Screws already owned
GRAND TOTAL: $63
I'll be linking this easy-peasy but oh-so-useful DIY to these lovely blogs:
On top of this wonderful project that will give me my much-needed storage, I also have a little gift on the way from West Elm. Right now, they have 20% off window treatments AND most of them are included in free shipping. I needed 108 in. panels so I was excited to score 2 of these for a total of $62!
I see the light at the end of the tunnel and a complete DIY Office Reveal in my near future!
I decided to tackle another project in the office and get that much closer to calling it "finished." Well, finished for now :) But first, I thought I better fill you in on a favorite element I added a couple of months ago. Let there be LIGHT!
That dining room chandelier just wasn't doin' it for me. Enter my beloved West ElmGlobe Pendant:
I have to give props to the Mr. for being my knight in shining armour when it came to installing that beauty. Here she is in all her glory:
LOVE. One more pic for good measure...and because I heart my new light fixture:
That was the good. Now for the bad and ugly. You can't see it from this angle, but there is a corner just to the front right of the desk that holds my stuff. Stuff=fabric, sewing machine, JUNK. Case in point:
I. need. storage. So we headed to Lowe's and came home with my next DIY project:
I've been wanting to DIY and just didn't find the time. But Katie and Sherry kicked my bootie into high gear with:
...I finally got on the ball and completed a few DIY projects in the office--and just in time for me to decide to take on a little business venture. More about that in the next couple of weeks, but for now...let's bask in the bliss of my newly completed linen pinboard with brass nailhead trim. Total cost was approximately $50. Still a bit pricey, but a much cheaper alternative to the $149 Pottery Barn price tag. Yes, I'll take the DIY version for 1/3 the price please!
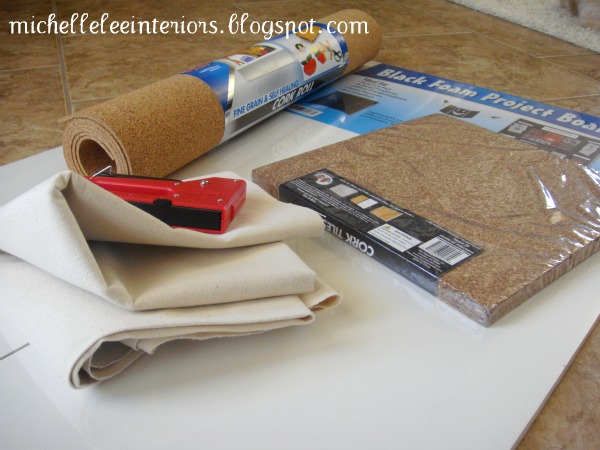
I got my supplies from JoAnn's and Hobby Lobby (that way I could purchase everything with a coupon...sneaky, I know.). You'll need:
1. cork (duh)-I used a 2x3 roll AND 1 pack of 12 in x 12 in tiles (this made my board 4x3)
2. foam core (already 4x3 when it opens so I didn't have to alter it at all)
3. spray adhesive-I like the light because it's movable. I tend to freak out when things aren't perfect and this lets me slide things around a bit until they get how I want them
3. staple gun
4. fabric of your choice- I used linen because it was cheap-o when I went (4.99/yd)
5. nailhead trim-I picked up a roll of trim at JoAnn's because it should work great for this project and be super easy!
Unroll the cork and let it flatten for a bit. Then adhere the cork to your foam core using the spray adhesive. The edges on my roll weren't sticking very well so I went ahead and stapled them down along with a few additional "safety" staples in random areas to make sure the cork wasn't going anywhere! Then, just like a present, pull your material tightly and staple once in the center of each side (if your fabric has a pattern on it, don't forget to check and make sure it's centered and straight during that step). Continue pulling tightly and stapling every inch or two to finish it up. Take a trip around your edge with the nailhead trim and there you have it!
I heart it. I can't wait to start pinning all the great inspiration I find in my magazines! I got those amazing resin antlers for $12 at Hobby Lobby, the glass milk vase at Dillards for $2, and the pillow cover is my latest DIY using an Anthropologie napkin with a black and white herringbone pattern on the back! I. Love. It.
So, what do ya think? Ready to whip up a pinboard and napkin pillow cover yourself?!
Wishing you a Pinspired Wednesday!
P.S. The pillow cover is a huge hint on what I've got in the works. I'm off to cut more fabric :)
Let's take a walk down memory lane, shall we? Here's our formal dining room when we purchased our home just six short months ago:
Then we painted the space, moved in our dining room table and chairs and called it progress:
About three months went by and we had eaten at our table a whopping one time. See, we aren't exactly "formal dining room" kind of people. We are "eat in front of the t.v. because we wouldn't want to miss out on Auction Hunters" kind of people. So we did some changing and rearranging and had a different kind of progress.
The dining room table was moved to our eat-in-kitchen area that was previously empty, awkward, and a waste of space.
And I'm not sure you can call this "progress" exactly, but it was definitely a step in the right direction for us!
I threw together a design board (one of which I have strayed majorly from and hope to do an updated version a.s.a.p!) and put on my creativity cap. One peacock blue desk, chevron wall, and bamboo chair later...and we are truckin' right along.
This past weekend, I got a second (and possibly a third and fourth) wind and decided to kick it into high gear so I can actually use this space. For the last few weeks I've been stalking TJ Maxx and Hobby Lobby for any and all large frames on clearance (didn't care about color because I knew I'd be spray painting them anyways, so I just looked for shape and condition). I managed to score a few 8 X 10 frames for only $5 bucks each and got a few raw wood open back frames 50% off at $5 and $8 each. Between my bargain shopping and my already plentiful stash I had stored in the closet for emergency use only, I finally had enough for my gallery wall.
Now, this isn't my first time at the rodeo (remember my wall-o-shelves and gallery wall in the living room), but it was definitely a much larger project this time around. I started just like last time--cutting out newspaper silhouettes for wall placement help later on.
Then, I spray painted all the frames that weren't white already. I decided to do a mixture of white and off-white because our moulding and ceiling are off-white and so were the chevron stripes. I did this in my first gallery wall too!
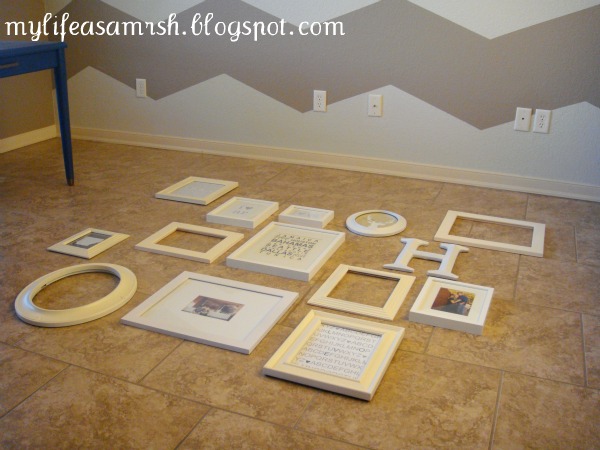
Next, time to lay them out like you want them on the wall! Since this wall was really large and I had 14 frames, I started with the five frames I wanted to highlight (and they were 5 of the biggest) and placed them in the shape of a W. This helps spread out your large frames (so you don't end up with them all on one side and all the small frames on the other) and the different frame styles. Notice I have a matted, open-back, oval, and a couple unmatted frames making up my W.
Then, just start filling in the holes. A few things to remember:
1. Make sure your like-frames are spread throughout.
2. Make sure your pictures and art in the frames are spread throughout (you don't want all of your pictures on one side of the wall and all of your printables on the other)
3. If you have unique items, in this case I have an "H" and antlers on the way (not pictured), make sure those items are spread apart as well.
4. Don't spread the items/frames too far apart. When they are too far apart from each other, the wall no longer looks like a whole...just a lot of pieces!
All of these things help weight your wall evenly while the original W shape sets the foundation.
Once you've got your tentative layout, time to place those bad boys on the wall--in newspaper form! You will end up moving something around, so doing a nail-free run will save you lots of headache (and nail removing) in the long run.
I ended up doing a little switcharoo near the bottom and placed a white sheet of paper as a stand in for my antlers.
Now, here she is in all of her gallery wall glory:
Even though it cuts out the top few items, this is my favorite pic since the chandy is no where in sight. I'm saving my pennies and have my eyes on the perfect pendant!
I may still add a few things to either side (especially since my West Elm antlers ended up sticking out more than up like in the online pics), but I'm happy for the moment and ready to move onto other things...like my DIY pinboard you can see there on the right. I'm currently in the middle of adding the nailhead trim and hope to show my how-to next week! Other changes to the office included repainting my previously oil rubbed bronze desk hardware to an antiqued brass. The ORB was just too dark and the desk screamed the need for brass hardware with its mid century modern style! Paired with the bamboo chair, it's a match made in office heaven!
Still to do:
1. Chevron Wall2. Desk
3. Gallery Wall
4. Rug (or steal the one from the living room and replace that one?)
5. New overhead light fixture (pendant)
6. Curtains-->just picked these up...gotta get a rod though!
Well, I still love them. And they're still a steal compared to some of the other taxidermy out there. But look at what I spied with my little eye today while perusing my other love, Hobby Lobby:
Oh, did I mention they only cost me $12 bucks? I left the store cloud nine. Don't worry, I already found a home for them and I can't wait to show it off later this week! Happy Tuesday!
Have you ever tried shopping for the perfect chair? It's mind-boggling. so. many. choices. Well, when I first started dreaming up my office/craft room moodboard, I thought I already had the perfect chair in mind. This blue bombshell from Urban Outfitters:
But after deciding to go bold and paint the desk blue, a blue chair wasn't really in the cards anymore. So, back to the drawing board. With my chevron wall as a backdrop, I want something with really clean lines that isn't going to compete for attention with my bold desk and wall. Someone's gotta blend in.
I have a few contenders that I'm trying to narrow down so I can hopefully start using my office/craft room. Here are my top three:
Unfortunately, I can't afford the vintage Eames Rocker, but this baby is a pretty good repro and sports a $139 price tag on Overstock. It has great reviews and I like the idea of a rocker in the office for ease of movement (you know, for when ya scoot).
Of course, the rockers fraternal twin is option #2. I love the sexy wood legs (yep, chair legs can be sexy) and I can already see it in the room. Another Overstock bargain since you get TWO for $169. And since I'm planning on having similar chairs in our dining room, these would be a great option for additional seating. Always gotta be thinking about function and practicality. Again, great reviews but I'm slightly concerned with stability as well as height (both him and his twin have this problem). The Mr. is 6'4" and some of the reviews voiced how low it sits to the ground as it's biggest fault.
And option #3. I have a secret. I have a crush on this Urban Outfitters chair. The clean lines, the bamboo frame, and the warmth it could bring to the room are all wrapped up in its stellar $149 price tag. I really wish UO had reviews, but I may call their Customer Service line and see what I can find out. It does sit a few inches higher than the other two, so that may be what pushes this puppy over the top!
Decisions, decisions. Any and all opinions are welcome because this obviously isn't going to be easy for me.
I'm a newlywed and Interior Decorator with a passion for coffee, shopping, and creating styled interiors for every budget. Contact me for more information at michelleleeinteriors@gmail.com.