skip to main | skip to sidebar
Michelle Lee Interiors
  • contact
  • design boards
  • home tour
  • services
  • shop
  • home
  • Show all posts
Showing posts with label Gallery Wall. Show all posts

Sunday

Attention: We Have a Nook

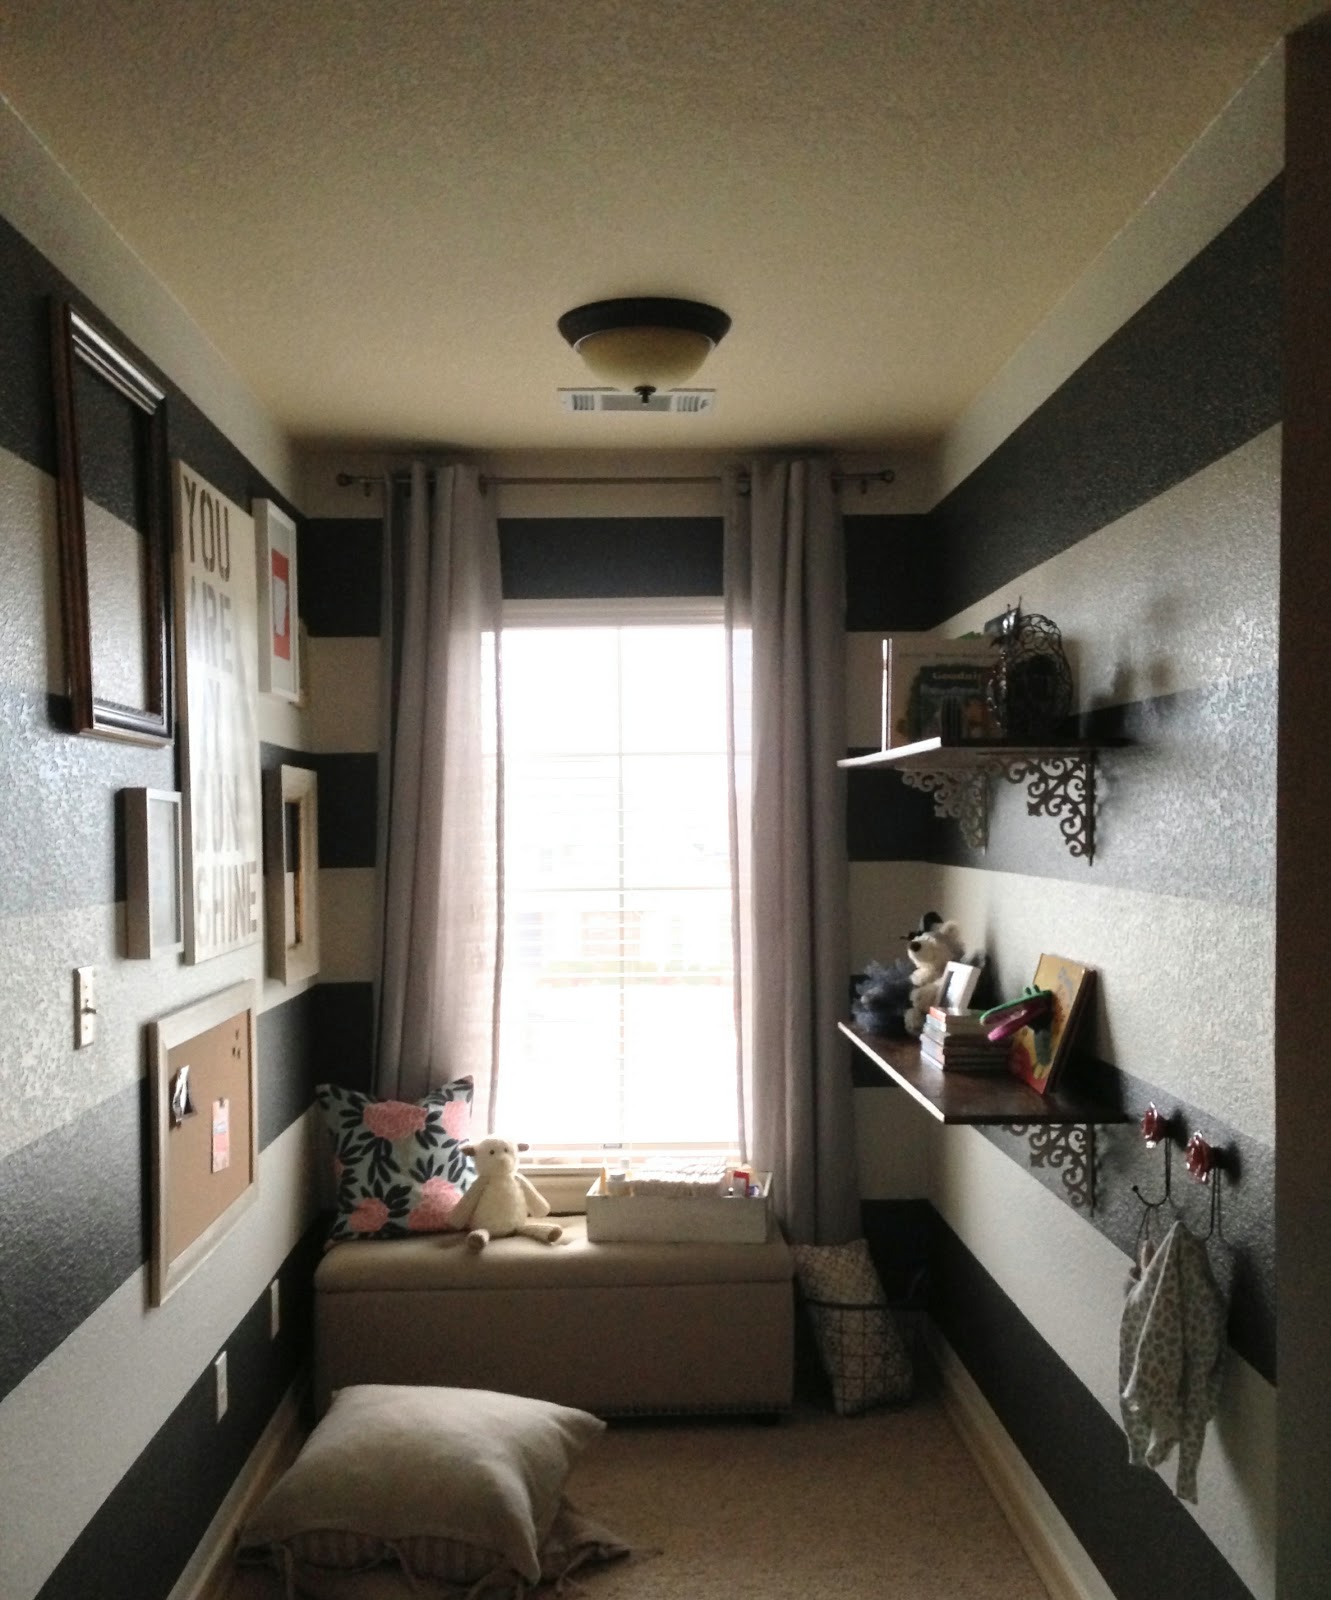
The nursery is "complete."  I say it in quotations because design is never really finished...and I know I'll continue to tweak and add goodies as I find them!  So, let's get this party started by taking a look at where we started with the "nook" when we moved in.
Wow.  That yellow was really bright.  Step one...paint!
Let me say this out loud...I hate painting stripes.  For some reason, I had blocked out the terrible memory from my chevron stripe extravaganza and decided to paint them again.  I have to say...it DOES make quite the statement!  FYI, I used Sherwin Williams Urbane Bronze (dark) and Shoji White (light).
Next up was the small gallery wall on the left side.  I knew I wanted to do shelves on the right and needed to balance it out.  I ended up doing a mixture of frames so it looked more "collected."  Plus, I wanted it to be a little different than the ones in the living room and office.  The shelves were another DIY.  We bought the boards from Lowe's, sanded them, and gave them a few coats of stain.  I picked up the metal corbels at Hobby Lobby.  They were originally $7.99 each and they were 50% off that week!  I'll take 4 corbels for $16!  Then I spray painted them with one of the maaaany cans of off-white spray paint I have lying around and bada-bing bada-boom...we've got shelving people!
I made some of the art for the wall...


This was made a lot like I did my subway art for the living room.  I made a couple of my own prints and got the State Print from Jenna Sue Designs!  I highly recommend her!  She has all kinds of prints...I especially love her Maps!


I found the furniture score of a lifetime at TJ Maxx.  Unfortunately, I passed it up way back when I had no use for it.  I talked about it for months.  And then, one February day when I was strolling through TJ Maxx, I saw it.  Tufted.  Nailhead trim.  Linen.  The storage bench dreams are made of and at a STEAL for $129.  I couldn't find an associate to take it to the front fast enough.  My favorite pillow cover also lives here.  And that cute little lamb does double duty as a room freshener!  It's a Scentsy Buddy!


So here she is in all her glory...our beloved reading corner.  I know we will spend lots of time cuddled up here when she gets a little older.  For now, we read a book a day and stare at the black and white stripes!  I wouldn't trade it for anything!

I'll be linking to these lovely ladies:

At the Picket Fence
The DIY Showoff
Serenity Now
The Shabby Nest
Shabby Creek Cottage
Just a Girl
Home Stories A to Z
Tatertots and Jello
Thrifty Decor Chick
The Lettered Cottage


Posted by Michelle @ Michelle Lee Interiors at Sunday, April 28, 2013 4 comments
Email ThisBlogThis!Share to XShare to FacebookShare to Pinterest
Labels: diy projects, Gallery Wall, nursery, paint

Wednesday

Gallery Wall Goodness

Let's take a walk down memory lane, shall we?  Here's our formal dining room when we purchased our home just six short months ago:
 Then we painted the space, moved in our dining room table and chairs and called it progress:
About three months went by and we had eaten at our table a whopping one time.  See, we aren't exactly "formal dining room" kind of people.  We are "eat in front of the t.v. because we wouldn't want to miss out on Auction Hunters" kind of people.  So we did some changing and rearranging and had a different kind of progress.

The dining room table was moved to our eat-in-kitchen area that was previously empty, awkward, and a waste of space.
And I'm not sure you can call this "progress" exactly, but it was definitely a step in the right direction for us!

I threw together a design board (one of which I have strayed majorly  from and hope to do an updated version a.s.a.p!) and put on my creativity cap.  One peacock blue desk, chevron wall, and bamboo chair later...and we are truckin' right along.

This past weekend, I got a second (and possibly a third and fourth) wind and decided to kick it into high gear so I can actually use this space.  For the last few weeks I've been stalking TJ Maxx and Hobby Lobby for any and all large frames on clearance (didn't care about color because I knew I'd be spray painting them anyways, so I just looked for shape and condition).  I managed to score a few 8 X 10 frames for only $5 bucks each and got a few raw wood open back frames 50% off at $5 and $8 each.  Between my bargain shopping and my already plentiful stash I had stored in the closet for emergency use only, I finally had enough for my gallery wall.

Now, this isn't my first time at the rodeo (remember my wall-o-shelves and gallery wall in the living room), but it was definitely a much larger project this time around.  I started just like last time--cutting out newspaper silhouettes for wall placement help later on.
Then, I spray painted all the frames that weren't white already.  I decided to do a mixture of white and off-white because our moulding and ceiling are off-white and so were the chevron stripes.  I did this in my first gallery wall too!

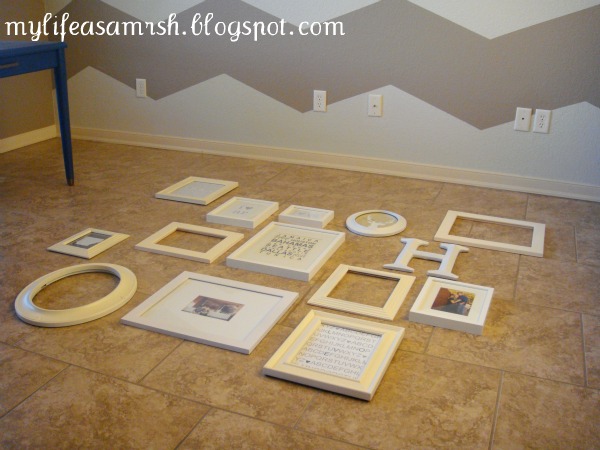
Next, time to lay them out like you want them on the wall!  Since this wall was really large and I had 14 frames, I started with the five frames I wanted to highlight (and they were 5 of the biggest) and placed them in the shape of a W.  This helps spread out your large frames (so you don't end up with them all on one side and all the small frames on the other) and the different frame styles.  Notice I have a matted, open-back, oval, and a couple unmatted frames making up my W.
Then, just start filling in the holes.  A few things to remember:

1. Make sure your like-frames are spread throughout.
2. Make sure your pictures and art in the frames are spread throughout (you don't want all of your pictures on one side of the wall and all of your printables on the other)
3. If you have unique items, in this case I have an "H" and antlers on the way (not pictured), make sure those items are spread apart as well.
4. Don't spread the items/frames too far apart.  When they are too far apart from each other, the wall no longer looks like a whole...just a lot of pieces!

All of these things help weight your wall evenly while the original W shape sets the foundation.
Once you've got your tentative layout, time to place those bad boys on the wall--in newspaper form!  You will end up moving something around, so doing a nail-free run will save you lots of headache (and nail removing) in the long run.
I ended up doing a little switcharoo near the bottom and placed a white sheet of paper as a stand in for my antlers. 

Now, here she is in all of her gallery wall glory:
Even though it cuts out the top few items, this is my favorite pic since the chandy is no where in sight.  I'm saving my pennies and have my eyes on the perfect pendant!
 I may still add a few things to either side (especially since my West Elm antlers ended up sticking out more than up like in the online pics), but I'm happy for the moment and ready to move onto other things...like my DIY pinboard you can see there on the right.  I'm currently in the middle of adding the nailhead trim and hope to show my how-to next week!  Other changes to the office included repainting my previously oil rubbed bronze desk hardware to an antiqued brass.  The ORB was just too dark and the desk screamed the need for brass hardware with its mid century modern style!  Paired with the bamboo chair, it's a match made in office heaven!

Still to do:

1. Chevron Wall2. Desk
3. Gallery Wall
4. Rug (or steal the one from the living room and replace that one?)
5. New overhead light fixture (pendant)
6. Curtains-->just picked these up...gotta get a rod though!
7. DIY Inspiration Pinboard
8. Add storage (open shelves? industrial shelving unit? floating cabinets?)
9. Chair
10. Cute accessories to hold my desk goodies


I'll be linking to these lovely parties:
At the Picket Fence
The DIY Showoff
Serenity Now
The Shabby Nest
Shabby Creek Cottage
Just a Girl
Home Stories A to Z
Tatertots and Jello
Thrifty Decor Chick
The Lettered Cottage
Posted by Michelle @ Michelle Lee Interiors at Wednesday, October 19, 2011 21 comments
Email ThisBlogThis!Share to XShare to FacebookShare to Pinterest
Labels: dining room, diy projects, Gallery Wall, gallery wall frames, home accessories, linking up to, office/craft room

Friday

Wall Art Goodness

If you follow me on twitter or facebook, I gave you a sneak peek at my super special secret project I've been working on.  Okay, obviously not super secret because I posted it on my social networking sites but it is definitely special!  I'm brewing up another gallery wall, this time in my office, and I've got my tips and tricks to mastering the organized chaos that is a bunch of frames slapped up in a group!  However, due to unforeseen circumstances (ahem, West Elm backorders) I'm not able to offer my secrets just yet.  But I've got something almost better.  What does every gallery wall need to be truly complete besides frames? 
...
Stuff to put in them!

So here's a little roundup of inspiration so your gallery wall doesn't look like a framed wedding collage, or shrine to your kids, or a bunch of party pics from the old college days!

Pinned Image
VIA

Pinned Image
VIA

Pinned Image
VIA

Pinned Image
VIA

Pinned Image
VIA

Pinned Image
VIA

Pinned Image
VIA

Which ones are you adding to your wish list?  Oh, all of them?  Me too!
Here's to a weekend of family, football, and a DIY project or two!  See you Monday!


P.S. This is a special shoutout to the Mr.--Happy Opening Weekend of Bow Hunting Season!  Get us a big one :)

P.P.S. All of these sources can be found on my Pinterest board here.
Posted by Michelle @ Michelle Lee Interiors at Friday, September 30, 2011 0 comments
Email ThisBlogThis!Share to XShare to FacebookShare to Pinterest
Labels: Gallery Wall, gallery wall frames, pinterest, shopping, things i heart

Monday

Wall-o-Shelves and Gallery Wall. Check.

The project started just three short months ago with this living room inspiration board that I dreamed up.  Then, I showed you my gallery wall inspirations along with some wall-o-shelves inspiration!  After an hour afternoon trip to IKEA, some bargain shopping at garage sales, and a handful of coupons at Gordman's and Hobby Lobby, we went from this:
BEFORE
To this:

AFTER
I apparently got a little camera happy trying to get every possible angle for the after shots.  So there are A. Lot. of pictures.  Enjoy!
Here's some of our stuff:
I'm in lurve with these linen boxes and magazine holders from IKEA!  They were a splurge since I had intended to go with the supa-cheap cardboard option before I saw these bad boys.  It was yet another way to add texture, forever storage (because we will be keeping these puppies for foreva!), and kept in theme with my mix and match of stark white with cream!
And now for some closeups of our gallery wall.  I showed you the process of putting this bad boy together here and here!  And don't forget my easy-peasy frame filling DIY projects (like my "pick your battles" poster and chair silhouette)!
And some more of our stuff:

Miss B wanted to get in on the action.  What a great little helper!
 
Okay, she's actually staring intently at a toy she just placed in my lap.  Anywho, there she is.  My l-oong project that was well worth the time, money, and I would say patience but the Mr. would beg to differ.  I'm still on the hunt for the perfect chair and end table for the corner to the right of the shelves.  One thing at a time.  In any case, the project is checked off of my mile long "to do" list and I couldn't be more excited!  Still a couple of tweaks to finish up (painting the rhino and dark chess pieces white) but no project is ever really finished anyways.  Right?

Posted by Michelle @ Michelle Lee Interiors at Monday, July 18, 2011 34 comments
Email ThisBlogThis!Share to XShare to FacebookShare to Pinterest
Labels: before and after, bookshelf, bookshelf decor, diy projects, Gallery Wall, gallery wall frames, home accessories, living room, storage
Older Posts Home
Subscribe to: Posts (Atom)

Meet Michelle

Meet Michelle
I'm a newlywed and Interior Decorator with a passion for coffee, shopping, and creating styled interiors for every budget. Contact me for more information at michelleleeinteriors@gmail.com.

INSTAGRAM

Shutterfly.com

THE SHOPPE

THE SHOPPE


Google Friend Connect

  • At The Picket Fence
  • Home Stories A to Z
  • Johnny In A Dress
  • Serenity Now-A Mommy's Solution to Staying Sane
  • 6th Street Design School
  • 7th House on the Left
  • ::: FOCAL POINT :::
  • abode love: a man's home is his wife's castle
  • Adventures in Decorating
  • Amber Interior Design
  • Arianna Belle
  • Arkansas Home Design Blog
  • Blog
  • Bower Power
  • bryn alexandra
  • Caitlin Creer Interiors
  • caitlin wilson design: style files
  • Centsational Girl
  • danielle oakey interiors
  • decor8
  • design dump
  • Design Evolution
  • Design Manifest
  • designsponge.com
  • Emily A. Clark
  • Gad•ding•Gal
  • Home Stories A to Z
  • House of Smith's
  • House*Tweaking
  • Just a Touch of Gray
  • Life in the Fun Lane
  • Live the Home Life
  • Living With Lindsay
  • MadeByGirl
  • Making it Lovely
  • modern jane
  • PW FULL RSS FEED
  • sadie + stella
  • Serenity Now-A Mommy's Solution to Staying Sane
  • SUSPENDED
  • Tatertots and Jello
  • Ten June
  • The DIY Show Off
  • The Lettered Cottage
  • The Mustard Ceiling
  • Third Floor Design Studio
  • Thrifty Decor Chick
Related Posts Plugin for WordPress, Blogger...

Grab my button!

summershoots
a month in re-view a year in re-view accent chair all about me area rugs bathroom be inspired bedroom before and after birthday blog luvin' bookshelf bookshelf decor chicken coffee table color combinations craigslist dining room diy projects dresser entertaining entryway etsy fall family fashion furniture Gallery Wall gallery wall frames garage sale get the look for less giveaway gray holidays home accessories house tour instagram key keeper kitchen lighting linking up to living room mason jars master bedroom mid century modern momma must-haves monthly pics moodboard nursery office/craft room offices organization our little family outdoor living paint pinterest pretty little things roundup salad sewing shopping spring storage styling summertime textiles the shop things i heart throw pillows trash to treasure vases what's for dessert what's for dinner yellow
 

the shoppe!