skip to main | skip to sidebar
Michelle Lee Interiors
  • contact
  • design boards
  • home tour
  • services
  • shop
  • home
  • Show all posts
Showing posts with label paint. Show all posts

Sunday

Attention: We Have a Nook

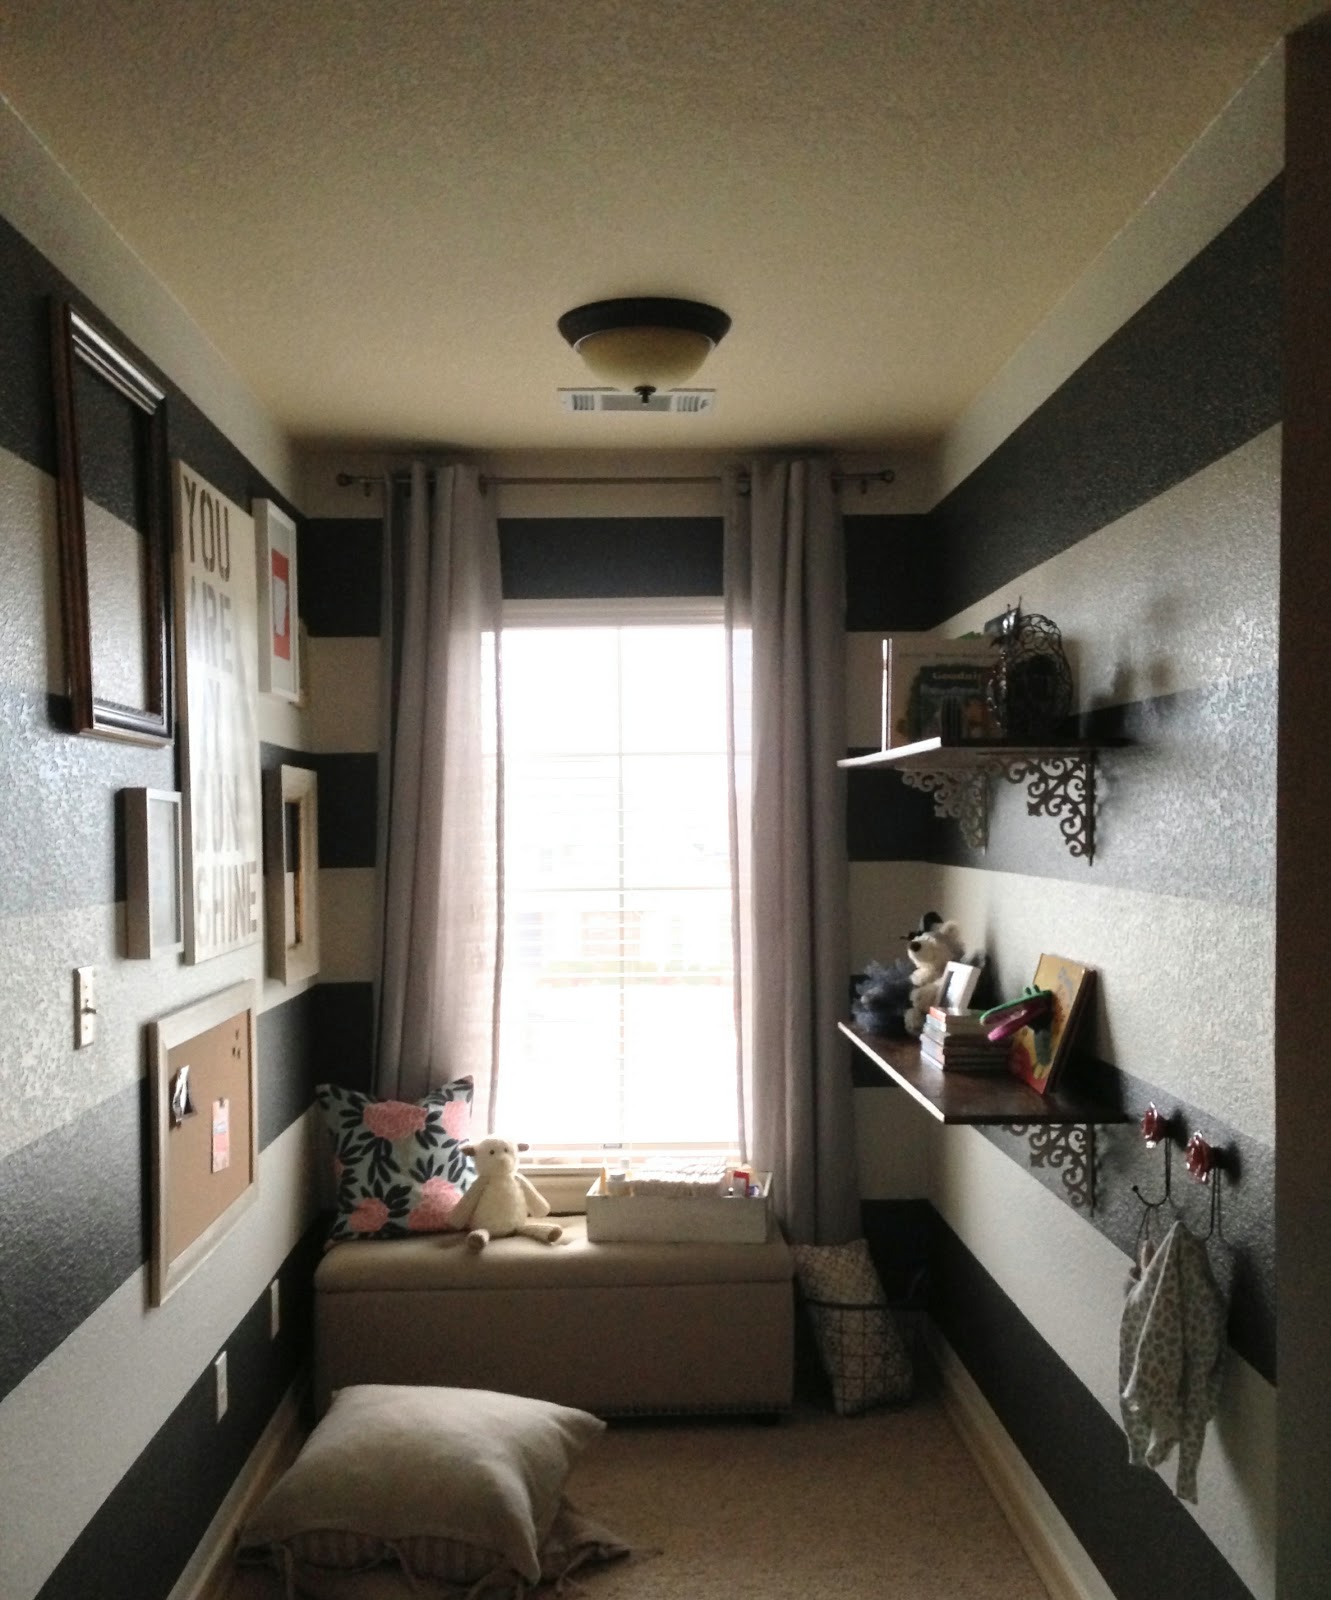
The nursery is "complete."  I say it in quotations because design is never really finished...and I know I'll continue to tweak and add goodies as I find them!  So, let's get this party started by taking a look at where we started with the "nook" when we moved in.
Wow.  That yellow was really bright.  Step one...paint!
Let me say this out loud...I hate painting stripes.  For some reason, I had blocked out the terrible memory from my chevron stripe extravaganza and decided to paint them again.  I have to say...it DOES make quite the statement!  FYI, I used Sherwin Williams Urbane Bronze (dark) and Shoji White (light).
Next up was the small gallery wall on the left side.  I knew I wanted to do shelves on the right and needed to balance it out.  I ended up doing a mixture of frames so it looked more "collected."  Plus, I wanted it to be a little different than the ones in the living room and office.  The shelves were another DIY.  We bought the boards from Lowe's, sanded them, and gave them a few coats of stain.  I picked up the metal corbels at Hobby Lobby.  They were originally $7.99 each and they were 50% off that week!  I'll take 4 corbels for $16!  Then I spray painted them with one of the maaaany cans of off-white spray paint I have lying around and bada-bing bada-boom...we've got shelving people!
I made some of the art for the wall...


This was made a lot like I did my subway art for the living room.  I made a couple of my own prints and got the State Print from Jenna Sue Designs!  I highly recommend her!  She has all kinds of prints...I especially love her Maps!


I found the furniture score of a lifetime at TJ Maxx.  Unfortunately, I passed it up way back when I had no use for it.  I talked about it for months.  And then, one February day when I was strolling through TJ Maxx, I saw it.  Tufted.  Nailhead trim.  Linen.  The storage bench dreams are made of and at a STEAL for $129.  I couldn't find an associate to take it to the front fast enough.  My favorite pillow cover also lives here.  And that cute little lamb does double duty as a room freshener!  It's a Scentsy Buddy!


So here she is in all her glory...our beloved reading corner.  I know we will spend lots of time cuddled up here when she gets a little older.  For now, we read a book a day and stare at the black and white stripes!  I wouldn't trade it for anything!

I'll be linking to these lovely ladies:

At the Picket Fence
The DIY Showoff
Serenity Now
The Shabby Nest
Shabby Creek Cottage
Just a Girl
Home Stories A to Z
Tatertots and Jello
Thrifty Decor Chick
The Lettered Cottage


Posted by Michelle @ Michelle Lee Interiors at Sunday, April 28, 2013 4 comments
Email ThisBlogThis!Share to XShare to FacebookShare to Pinterest
Labels: diy projects, Gallery Wall, nursery, paint

Monday

So, I've been thinking...

...err, pinning really.  Seriously, Pinterest, get it.  Love it.  Pin it!  Here's what I found pin-worthy lately!

How great is this canvas art?  I'm loving the street names and directions as the art.  And then putting it in a gallery wall for an even bigger impact--genius.
VIA

What a great farmhouse style sliding door (kind of like a pocket door!).  What a great conversation starter!

VIA

L.o.v.e the apothecary jars for laundry fixins and galvanized tubs for storage!
VIA

How stinkin' cute!  I'm sure I can work this into the craft room/office in one way or another!
VIA

It's no secret.  I have a thing for owls.  They are popping up everywhere in our house and this pillow will be part of our decor family soon!
VIA

So, I've been thinking.   I have this huge empty corner that would be the perfect spot for a nice big piece of subway art.  So off to Etsy I went and WOW--$250 for the size I need (roughly 4' x 2 1/2').  No.Thank you.  Then, I stumbled upon this beauty by House of Smiths and fell in love.
VIA

Yep, I've got something up my sleeve now and thought I'd give you a little sneak-peek!
If I don't post for a few days, you know where I am.  I'll be cutting, cutting, and cutting some more.  Then sanding and gluing and painting...oh my!  Whew!  It's gonna be a busy week!

P.S.  All of these images can be found here.

P.S.S.  Remember my dresser makeover?  I finished painting our bed frame (which also sported matching blonde wood just like the dresser) and painting the room (which donned the yellow walls you've seen throughout).  So I finally added PROGRESS shots of our Master Bedroom to the Our Home tab!  No real BEFORE shots because I didn't realize how muy importante that was in the beginning of this whole journey!  Doy.  I'll do better, I promise.
Posted by Michelle @ Michelle Lee Interiors at Monday, August 15, 2011 2 comments
Email ThisBlogThis!Share to XShare to FacebookShare to Pinterest
Labels: be inspired, before and after, diy projects, dresser, house tour, master bedroom, paint, pinterest

My Big Fat Chevron Wall

Happy Monday y'all!  I hope everyone had a great weekend!  I worked my bootie off to make some progress on our craft room/office (especially since my Craigslist desk is ready and rearin' to go).  After coming up with my craft room moodboard, I knew I wanted to do something unique on the walls.  We were cursed blessed with textured walls, so I'm a little limited.  But I wasn't going to let it get me down.  Besides, I've got a love for chevron and I knew it would be the perfect show-stopping element for the room!

First, I did lots, and lots, and lots of reading on how to paint stripes on textured walls.  The consensus, push that tape down hard with your finger to get in all the crevices.  So I went out and invested in Frog Tape (since that also seemed to reign supreme in the painting community), picked up a couple of color samples, and rounded up the rest of my supplies for a weekend of chevron fun!

Step 1-Divide the wall in half with your first vertical line. 

Tip:  use a chalk line for your vertical lines if you don't want to hassle with peeling tape as you go during your horizontal striping process.

Step 2-Grab your laser level and get busy.  I divided my two sides in half, then in half again.  Each line will be a point in your chevron stripe.

My vertical stripes ended up being 17 1/2 inches apart and I decided to go with that same measurement for the width of the strips. 

Step 3-Mark your points.  Every other strip was marked every 17 1/2 inches, then the strips in between were started at 8 3/4 (half of 17 1/2) inches to start, then up every 17 1/2 inches so the lines stagger.  Mark your first 2 lines, then use a laser level to mark the rest on down the wall.  Here's my super technical laser level holder. 

Now you're ready to start marking your zig zags!  This was my favorite part because you really got to see it starting to come together!

Step 4-Connect the dots!  Be consistent in your taping.  Each time I taped I started my point on the right side of the tape, under my pencil mark.  This is really, REALLY important so you don't end up with an uneven pattern.

Step 5-Because I didn't use chalk, darn hindsight, I had to pull up my vertical tape as I taped my chevron stripes.

Time to paint!

Step 6-Push down the edges of your tape where you'll be painting.  This will get the tape sealed off in all the crevices.

Step 7-Use a sponge brush to create a seal around the edges.  Then roll away!

Have plenty of time to paint so you can get your second coat on and pull up your tape before your paint dries!  You'll reveal crisp, beautiful lines!

And the finished product:

One more BEFORE and PROGRESS
I'm still searching for the perfect chair for the space, but I stop and stare each time I walk past the room.  The Mr. thinks I'm a weirdo, but I can't believe what paint can do!  I'm excited to see we're making progress on this room!


I'll be linking to these fab linky parties this week!  Check 'em out and find a new friend to add to your reader!

The DIY Showoff
At the Picket Fence
Serenity Now
The Shabby Nest
The Shabby Creek Cottage
Thrifty Decor Chick
AKA Design
Home Stories A to Z
Posted by Michelle @ Michelle Lee Interiors at Monday, August 08, 2011 19 comments
Email ThisBlogThis!Share to XShare to FacebookShare to Pinterest
Labels: dining room, diy projects, office/craft room, paint

Tuesday

Craigslist Desk Makeover. Check!

It's finally finished and I'm so excited to show this puppy off!  Remember my Craigslist desk?  Well, I had a hard time figuring out what to do with it because she was in pretty bad shape.  I decided to go bold (which I was debating here) and I absolutely love it.  I definitely have to do some tweaking on my office/craft room moodboard, but I'm so stinkin' happy with how it turned out!  Let's take one more look at the before:

BEFORE

AFTER


I ended up going with Olympic Zero VOC paint in Blue Tang.  It was my first time working with Olympic paint (I've always used Valspar) and the coverage wasn't great, but it wasn't bad for the money.  I've been dying to paint something Oil Rubbed Bronze and I figured this hardware was my chance.  All I need now is a chair!  Don't worry.  I'm on the hunt and can't wait to show you what I find and my big paint project that I've got going on for the office/craftroom!

Alright, let's break it down!

Craigslist find (the desk, duh) $30
Peacock Blue Paint $8
Oil Rubbed Bronze Spray Paint $4

Grand Total = $42  Not too shabby!

One more BEFORE and AFTER:

I'll be linking up to:
The DIY Showoff
At the Picket Fence
Serenity Now
The Shabby Nest
The Shabby Creek Cottage
Thrifty Decor Chick

Posted by Michelle @ Michelle Lee Interiors at Tuesday, August 02, 2011 12 comments
Email ThisBlogThis!Share to XShare to FacebookShare to Pinterest
Labels: before and after, diy projects, furniture, linking up to, office/craft room, paint

Friday

Sneak-a-Peek

Is anyone else in complete denial that it's already the end of July!  I guess time really does fly when you're having fun working on DIY projects!  I've been working super hard this week and I wanted to give you a little sneak peek until I can give you the full run down on Monday!  I'm working on our office/craftroom (check out my inspiration here) and I've got a huge painting project underway (hint:  it's NOT plain ol' stripes.  That wouldn't be any fun now would it?).  And what's that in the bottom left corner?
It looks blue to me y'all!  And this handy dandy laser level that the Mr. found on clearance (I taught him well) has become my BPFF (Best Project Friend Forever)! 
I can't wait to put on my paint clothes and work until the wee hours of the night to show off my oh-so-exciting and way-outta-my-comfort-zone DIY projects that are making a huge impact for very little moo-la.  Have a great weekend and happy projecting...or relaxing.  Whatever floats your boat!

I'll be linking my little Wall-o-Shelves + Gallery Wall project to these par-tays so head over, check them out, and be inspired!  Have a great weekend!
Weekend Bloggy ReadingFeathered Nest Friday
Posted by Michelle @ Michelle Lee Interiors at Friday, July 29, 2011 0 comments
Email ThisBlogThis!Share to XShare to FacebookShare to Pinterest
Labels: diy projects, linking up to, office/craft room, paint
Older Posts Home
Subscribe to: Posts (Atom)

Meet Michelle

Meet Michelle
I'm a newlywed and Interior Decorator with a passion for coffee, shopping, and creating styled interiors for every budget. Contact me for more information at michelleleeinteriors@gmail.com.

INSTAGRAM

Shutterfly.com

THE SHOPPE

THE SHOPPE


Google Friend Connect

  • At The Picket Fence
  • Home Stories A to Z
  • Johnny In A Dress
  • Serenity Now-A Mommy's Solution to Staying Sane
  • 6th Street Design School
  • 7th House on the Left
  • ::: FOCAL POINT :::
  • abode love: a man's home is his wife's castle
  • Adventures in Decorating
  • Amber Interior Design
  • Arianna Belle
  • Arkansas Home Design Blog
  • Blog
  • Bower Power
  • bryn alexandra
  • Caitlin Creer Interiors
  • caitlin wilson design: style files
  • Centsational Girl
  • danielle oakey interiors
  • decor8
  • design dump
  • Design Evolution
  • Design Manifest
  • designsponge.com
  • Emily A. Clark
  • Gad•ding•Gal
  • Home Stories A to Z
  • House of Smith's
  • House*Tweaking
  • Just a Touch of Gray
  • Life in the Fun Lane
  • Live the Home Life
  • Living With Lindsay
  • MadeByGirl
  • Making it Lovely
  • modern jane
  • PW FULL RSS FEED
  • sadie + stella
  • Serenity Now-A Mommy's Solution to Staying Sane
  • SUSPENDED
  • Tatertots and Jello
  • Ten June
  • The DIY Show Off
  • The Lettered Cottage
  • The Mustard Ceiling
  • Third Floor Design Studio
  • Thrifty Decor Chick
Related Posts Plugin for WordPress, Blogger...

Grab my button!

summershoots
a month in re-view a year in re-view accent chair all about me area rugs bathroom be inspired bedroom before and after birthday blog luvin' bookshelf bookshelf decor chicken coffee table color combinations craigslist dining room diy projects dresser entertaining entryway etsy fall family fashion furniture Gallery Wall gallery wall frames garage sale get the look for less giveaway gray holidays home accessories house tour instagram key keeper kitchen lighting linking up to living room mason jars master bedroom mid century modern momma must-haves monthly pics moodboard nursery office/craft room offices organization our little family outdoor living paint pinterest pretty little things roundup salad sewing shopping spring storage styling summertime textiles the shop things i heart throw pillows trash to treasure vases what's for dessert what's for dinner yellow
 

the shoppe!