skip to main | skip to sidebar
Michelle Lee Interiors
  • contact
  • design boards
  • home tour
  • services
  • shop
  • home
  • Show all posts
Showing posts with label dining room. Show all posts

Tuesday

Spring has Sprung...Sorta


At least it feels like Spring in mi casa!  I showed off my new storage shelves a couple weeks ago.  They  left a bit to be desired in the styling area.  Since we have our tv above the fireplace with all kinds of technology clutter surrounding it, I don't have a mantle to style for each season.  Why not style the top of this shelving appropriately and call it a day?!  So, here it is!  My spring shelf!
I mentioned it in my other post, but I got the faux window frame from Target.  It's actually a picture frame!  I already owned the pitcher (got it from JoAnns for cheap!) and stuck some $6 flowers in it from Sams Club!  Tip: create balance with your vignette by using an odd number of groupings of various heights.  Make sure to think about the colors of your items as well!  I made the wreath with a simple wreath form and a couple rolls of moss.  I tied it onto the frame with a simple piece of burlap.  The large metal letters came from Hobby Lobby.  I got them when they were 50% off so they were only $12 each!


DIYer-in-training!

There ya have it!  I love the pop of color it adds too!!

Anyone else compensating for the weather by bringing Spring inside??



**I'll be linking to these lovely ladies:
At the Picket Fence
The DIY Showoff
Serenity Now
The Shabby Nest
Shabby Creek Cottage
Just a Girl
Home Stories A to Z
Tatertots and Jello
Thrifty Decor Chick
The Lettered Cottage

Posted by Michelle @ Michelle Lee Interiors at Tuesday, May 07, 2013 1 comments
Email ThisBlogThis!Share to XShare to FacebookShare to Pinterest
Labels: bookshelf, bookshelf decor, dining room, diy projects, home accessories, kitchen, linking up to, living room, spring, storage, styling

Friday

Hutch Design Board

TGIF!  I'm leaving you with a Design Board I threw together for a friend wanting to spruce up a hutch she already owns!  After completing it, I decided I need to find a hutch a.s.a.p!


Happy weekend!

Posted by Michelle @ Michelle Lee Interiors at Friday, January 27, 2012 2 comments
Email ThisBlogThis!Share to XShare to FacebookShare to Pinterest
Labels: dining room, moodboard

Tuesday

Thanksgiving Tablescape Planning: Place Setting


It's officially Thanksgiving Week and I've got my table settings in place while I finish up the centerpiece!  We started gathering inspiration here, rounded up our textiles here, now we get to put it all together for a styled table.

I gathered everything I had that might work for the table setting and put it in one place so I could pull from my pile easily.  I ended up tying twine around my silverware for a simple rustic touch:
We decided to go with stemless glassware because they can be used for ice water or wine.  Then I took my chevron napkins that I whipped up, my new chargers and plates, and my $.60 cent Hobby Lobby pumpkins and finished up the place setting! 
As for the runner, I layered an orange pashmina that I already owned with a strip of burlap I'd been using as a fall runner, and then my $4 clearance Pottery Barn runner.  I love the textures it adds and everything was on-hand!

Here's a snippet of the rest of the table:
Who else has their table set?  I'm ready for a weekend full of family and football!  How about you?  Any brave Black Friday shoppers out there mapping your gameplan?


I'll be linking to these lovely ladies:
At the Picket Fence
The DIY Showoff
Serenity Now
The Shabby Nest
Shabby Creek Cottage
Just a Girl
Home Stories A to Z
Tatertots and Jello
Thrifty Decor Chick
The Lettered Cottage

Posted by Michelle @ Michelle Lee Interiors at Tuesday, November 22, 2011 4 comments
Email ThisBlogThis!Share to XShare to FacebookShare to Pinterest
Labels: dining room, fall, holidays, linking up to

Thanksgiving Tablescape Planning: Textiles

I'm back with my Thanksgiving Tablescape planning progress!  We started here, gathering inspiration for a color scheme as well as a couple of table setting ideas.

Step 2:  Round up what you've got!  Textiles, centerpiece items, dinnerware, etc.

I told you I originally gained my color inspiration from a piece of fabric I had on hand.  The inspirational blue chevron fabric will be our napkins.  I paired it with a vintage floral pattern that will be made into a couple of pillows to dress up the chairs we will be bringing in from our outside dining set in order to have enough seating.  I brought in the burlap for texture and a white and orange greek key table runner.  I had everything on hand already, woot!

Here are my goods, all rounded up together:

1. ZigZag fabric by Premier Prints, also available at fabric.com
2. Vintage Blossom fabric by Dwell Studio for Robert Allen Home, available at fabric.com or JoAnn's
3. Burlap, available at JoAnn's
4. Greek Key table runner, got it on clearance for $4 at Pottery Barn a few years ago (yep, it was a steal)

I also have an orange pashmina that will probably get tied in somehow if needed!

The thing I lacked most was dinnerware.  After doing some research online, I purchased these chargers from Pier 1 Imports, currently 20% off which made them a whopping $3.96 each!  They'll bring a lot of texture and are super versatile!
Natural Flower Placemat
I picked these plates up as well, also 20% off:
Deluxe Dinnerware
I've been dying to get new white plates and thought this was the perfect excuse.  Then, I headed to Hobby Lobby.  Fall decor is now 80% off folks!  I picked up 5 mini pumpkins and 7 mid-sized pumpkins (all fake of course) for $7!  I was having a really hard time finding them after Halloween, so this was my saving grace!

Next up, the DIY end of the decor!

So, how's your planning going?  Do you have much to buy or are you workin' with what you got?  Anyone else use hosting holiday dinners as an excuse to buy new stuff you've been wanting?  No?  Just me?

Have a great Tuesday y'all!

Posted by Michelle @ Michelle Lee Interiors at Tuesday, November 15, 2011 0 comments
Email ThisBlogThis!Share to XShare to FacebookShare to Pinterest
Labels: dining room, entertaining, fall, holidays, shopping, textiles

Friday

Get the Look For Less: Dining Room Chair

TGIF!  The week is coming to a close and that means college SEC football is gearing up for a huge...seriously, HUGE weekend!  My Arkansas Razorbacks (ranked 7th in the nation), are taking on number 9, South Carolina.  Another game not to miss--#1 and 2, LSU and Bama, play eachother as well.  Yes...it's going to be a great weekend (hopefully).

Now, on to decorating.  I have an obsession with mixing and matching dining room chairs.  This is one of my favorite examples:
Pinned Image
What a great way to get creative and add that little something special.  Disclaimer:  I heart West Elm (I just received a package and have another on the way).  While I was checking out the new catalog, I found this beauty with a not-so-pretty price tag ($249):
Porter Upholstered Armchair
I knew there had to be something similar out there for less.  Enter IKEA for $79:
NILS Armchair, black, Blekinge white Width: 23 5/8 " Depth: 22 1/2 " Height: 31 1/2 " Seat width: 18 1/2 " Seat depth: 16 7/8 " Seat height: 18 7/8 "  Width: 60 cm Depth: 57 cm Height: 80 cm Seat width: 47 cm Seat depth: 43 cm Seat height: 48 cm
You're not seeing double, just an example of how amazing furniture doesn't have to deplete the holiday funds.  And how great would a pair of these look flanking a farmhouse table?! 

So, have you ever mix and matched your dining room chairs?  Did  you have different styles or maybe the same style, but painted all different colors?

Have a great weekend and WOO PIG SOOIE!
Posted by Michelle @ Michelle Lee Interiors at Friday, November 04, 2011 2 comments
Email ThisBlogThis!Share to XShare to FacebookShare to Pinterest
Labels: accent chair, dining room, get the look for less, shopping

Wednesday

Gallery Wall Goodness

Let's take a walk down memory lane, shall we?  Here's our formal dining room when we purchased our home just six short months ago:
 Then we painted the space, moved in our dining room table and chairs and called it progress:
About three months went by and we had eaten at our table a whopping one time.  See, we aren't exactly "formal dining room" kind of people.  We are "eat in front of the t.v. because we wouldn't want to miss out on Auction Hunters" kind of people.  So we did some changing and rearranging and had a different kind of progress.

The dining room table was moved to our eat-in-kitchen area that was previously empty, awkward, and a waste of space.
And I'm not sure you can call this "progress" exactly, but it was definitely a step in the right direction for us!

I threw together a design board (one of which I have strayed majorly  from and hope to do an updated version a.s.a.p!) and put on my creativity cap.  One peacock blue desk, chevron wall, and bamboo chair later...and we are truckin' right along.

This past weekend, I got a second (and possibly a third and fourth) wind and decided to kick it into high gear so I can actually use this space.  For the last few weeks I've been stalking TJ Maxx and Hobby Lobby for any and all large frames on clearance (didn't care about color because I knew I'd be spray painting them anyways, so I just looked for shape and condition).  I managed to score a few 8 X 10 frames for only $5 bucks each and got a few raw wood open back frames 50% off at $5 and $8 each.  Between my bargain shopping and my already plentiful stash I had stored in the closet for emergency use only, I finally had enough for my gallery wall.

Now, this isn't my first time at the rodeo (remember my wall-o-shelves and gallery wall in the living room), but it was definitely a much larger project this time around.  I started just like last time--cutting out newspaper silhouettes for wall placement help later on.
Then, I spray painted all the frames that weren't white already.  I decided to do a mixture of white and off-white because our moulding and ceiling are off-white and so were the chevron stripes.  I did this in my first gallery wall too!

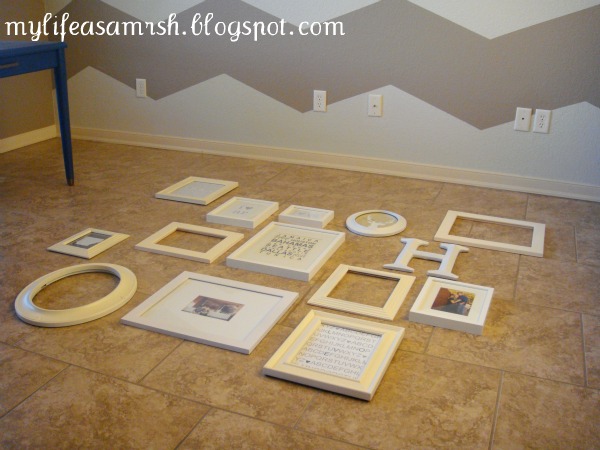
Next, time to lay them out like you want them on the wall!  Since this wall was really large and I had 14 frames, I started with the five frames I wanted to highlight (and they were 5 of the biggest) and placed them in the shape of a W.  This helps spread out your large frames (so you don't end up with them all on one side and all the small frames on the other) and the different frame styles.  Notice I have a matted, open-back, oval, and a couple unmatted frames making up my W.
Then, just start filling in the holes.  A few things to remember:

1. Make sure your like-frames are spread throughout.
2. Make sure your pictures and art in the frames are spread throughout (you don't want all of your pictures on one side of the wall and all of your printables on the other)
3. If you have unique items, in this case I have an "H" and antlers on the way (not pictured), make sure those items are spread apart as well.
4. Don't spread the items/frames too far apart.  When they are too far apart from each other, the wall no longer looks like a whole...just a lot of pieces!

All of these things help weight your wall evenly while the original W shape sets the foundation.
Once you've got your tentative layout, time to place those bad boys on the wall--in newspaper form!  You will end up moving something around, so doing a nail-free run will save you lots of headache (and nail removing) in the long run.
I ended up doing a little switcharoo near the bottom and placed a white sheet of paper as a stand in for my antlers. 

Now, here she is in all of her gallery wall glory:
Even though it cuts out the top few items, this is my favorite pic since the chandy is no where in sight.  I'm saving my pennies and have my eyes on the perfect pendant!
 I may still add a few things to either side (especially since my West Elm antlers ended up sticking out more than up like in the online pics), but I'm happy for the moment and ready to move onto other things...like my DIY pinboard you can see there on the right.  I'm currently in the middle of adding the nailhead trim and hope to show my how-to next week!  Other changes to the office included repainting my previously oil rubbed bronze desk hardware to an antiqued brass.  The ORB was just too dark and the desk screamed the need for brass hardware with its mid century modern style!  Paired with the bamboo chair, it's a match made in office heaven!

Still to do:

1. Chevron Wall2. Desk
3. Gallery Wall
4. Rug (or steal the one from the living room and replace that one?)
5. New overhead light fixture (pendant)
6. Curtains-->just picked these up...gotta get a rod though!
7. DIY Inspiration Pinboard
8. Add storage (open shelves? industrial shelving unit? floating cabinets?)
9. Chair
10. Cute accessories to hold my desk goodies


I'll be linking to these lovely parties:
At the Picket Fence
The DIY Showoff
Serenity Now
The Shabby Nest
Shabby Creek Cottage
Just a Girl
Home Stories A to Z
Tatertots and Jello
Thrifty Decor Chick
The Lettered Cottage
Posted by Michelle @ Michelle Lee Interiors at Wednesday, October 19, 2011 21 comments
Email ThisBlogThis!Share to XShare to FacebookShare to Pinterest
Labels: dining room, diy projects, Gallery Wall, gallery wall frames, home accessories, linking up to, office/craft room

Monday

My Big Fat Chevron Wall

Happy Monday y'all!  I hope everyone had a great weekend!  I worked my bootie off to make some progress on our craft room/office (especially since my Craigslist desk is ready and rearin' to go).  After coming up with my craft room moodboard, I knew I wanted to do something unique on the walls.  We were cursed blessed with textured walls, so I'm a little limited.  But I wasn't going to let it get me down.  Besides, I've got a love for chevron and I knew it would be the perfect show-stopping element for the room!

First, I did lots, and lots, and lots of reading on how to paint stripes on textured walls.  The consensus, push that tape down hard with your finger to get in all the crevices.  So I went out and invested in Frog Tape (since that also seemed to reign supreme in the painting community), picked up a couple of color samples, and rounded up the rest of my supplies for a weekend of chevron fun!

Step 1-Divide the wall in half with your first vertical line. 

Tip:  use a chalk line for your vertical lines if you don't want to hassle with peeling tape as you go during your horizontal striping process.

Step 2-Grab your laser level and get busy.  I divided my two sides in half, then in half again.  Each line will be a point in your chevron stripe.

My vertical stripes ended up being 17 1/2 inches apart and I decided to go with that same measurement for the width of the strips. 

Step 3-Mark your points.  Every other strip was marked every 17 1/2 inches, then the strips in between were started at 8 3/4 (half of 17 1/2) inches to start, then up every 17 1/2 inches so the lines stagger.  Mark your first 2 lines, then use a laser level to mark the rest on down the wall.  Here's my super technical laser level holder. 

Now you're ready to start marking your zig zags!  This was my favorite part because you really got to see it starting to come together!

Step 4-Connect the dots!  Be consistent in your taping.  Each time I taped I started my point on the right side of the tape, under my pencil mark.  This is really, REALLY important so you don't end up with an uneven pattern.

Step 5-Because I didn't use chalk, darn hindsight, I had to pull up my vertical tape as I taped my chevron stripes.

Time to paint!

Step 6-Push down the edges of your tape where you'll be painting.  This will get the tape sealed off in all the crevices.

Step 7-Use a sponge brush to create a seal around the edges.  Then roll away!

Have plenty of time to paint so you can get your second coat on and pull up your tape before your paint dries!  You'll reveal crisp, beautiful lines!

And the finished product:

One more BEFORE and PROGRESS
I'm still searching for the perfect chair for the space, but I stop and stare each time I walk past the room.  The Mr. thinks I'm a weirdo, but I can't believe what paint can do!  I'm excited to see we're making progress on this room!


I'll be linking to these fab linky parties this week!  Check 'em out and find a new friend to add to your reader!

The DIY Showoff
At the Picket Fence
Serenity Now
The Shabby Nest
The Shabby Creek Cottage
Thrifty Decor Chick
AKA Design
Home Stories A to Z
Posted by Michelle @ Michelle Lee Interiors at Monday, August 08, 2011 19 comments
Email ThisBlogThis!Share to XShare to FacebookShare to Pinterest
Labels: dining room, diy projects, office/craft room, paint

Friday

Changing and Rearranging

Lots goin' on over here at our lovely abode!  First off, I finally (after 3 months of living here) have gotten up most of our BEFORE pictures!  So click on the "Our Home" tab (see it?!)...
...and take a little tour of this lovely first home of ours! 

I showed you my super Craigslist score that inspired my Craft Room/Office the other day (click here for a refresher!).  In order to not use up one of the guest rooms and to make better use of our formal dining room (which we have eaten in ONCE since moving in), we planned an ol' switcheroo from formal dining to crafty goodness!  This means my PROGRESS shot went from this:
 to this:
I must have hit the decorating "Backspace" button?  Never fear!  My precious desk is in the garage, patiently awaiting it's transformation.  Until then, I'm l.o.v.i.n.g how the Great Room is looking with a now filled in eat-in kitchen (although I can't wait to get a table like this for my space, for now, this'ill do):

Notice my current centerpiece--I love not having to take up counter space for my baked goodies!
Yep, that's a half-eaten cookie, courtesy of the mister!  Anyhoo, I'm pretty stinkin' excited that we'll once again be using our dining room table instead of staring at it with starry eyes and wishing it were just a little closer to the television.  Not to mention, I'm ready to move that desk right on in! 

May your holiday weekend be filled with hot dogs, grilled corn on the cob, and an adult beverage...or two!  Happy 4th y'all!
Posted by Michelle @ Michelle Lee Interiors at Friday, July 01, 2011 4 comments
Email ThisBlogThis!Share to XShare to FacebookShare to Pinterest
Labels: dining room, house tour, living room, office/craft room
Older Posts Home
Subscribe to: Posts (Atom)

Meet Michelle

Meet Michelle
I'm a newlywed and Interior Decorator with a passion for coffee, shopping, and creating styled interiors for every budget. Contact me for more information at michelleleeinteriors@gmail.com.

INSTAGRAM

Shutterfly.com

THE SHOPPE

THE SHOPPE


Google Friend Connect

  • At The Picket Fence
  • Home Stories A to Z
  • Johnny In A Dress
  • Serenity Now-A Mommy's Solution to Staying Sane
  • 6th Street Design School
  • 7th House on the Left
  • ::: FOCAL POINT :::
  • abode love: a man's home is his wife's castle
  • Adventures in Decorating
  • Amber Interior Design
  • Arianna Belle
  • Arkansas Home Design Blog
  • Blog
  • Bower Power
  • bryn alexandra
  • Caitlin Creer Interiors
  • caitlin wilson design: style files
  • Centsational Girl
  • danielle oakey interiors
  • decor8
  • design dump
  • Design Evolution
  • Design Manifest
  • designsponge.com
  • Emily A. Clark
  • Gad•ding•Gal
  • Home Stories A to Z
  • House of Smith's
  • House*Tweaking
  • Just a Touch of Gray
  • Life in the Fun Lane
  • Live the Home Life
  • Living With Lindsay
  • MadeByGirl
  • Making it Lovely
  • modern jane
  • PW FULL RSS FEED
  • sadie + stella
  • Serenity Now-A Mommy's Solution to Staying Sane
  • SUSPENDED
  • Tatertots and Jello
  • Ten June
  • The DIY Show Off
  • The Lettered Cottage
  • The Mustard Ceiling
  • Third Floor Design Studio
  • Thrifty Decor Chick
Related Posts Plugin for WordPress, Blogger...

Grab my button!

summershoots
a month in re-view a year in re-view accent chair all about me area rugs bathroom be inspired bedroom before and after birthday blog luvin' bookshelf bookshelf decor chicken coffee table color combinations craigslist dining room diy projects dresser entertaining entryway etsy fall family fashion furniture Gallery Wall gallery wall frames garage sale get the look for less giveaway gray holidays home accessories house tour instagram key keeper kitchen lighting linking up to living room mason jars master bedroom mid century modern momma must-haves monthly pics moodboard nursery office/craft room offices organization our little family outdoor living paint pinterest pretty little things roundup salad sewing shopping spring storage styling summertime textiles the shop things i heart throw pillows trash to treasure vases what's for dessert what's for dinner yellow
 

the shoppe!