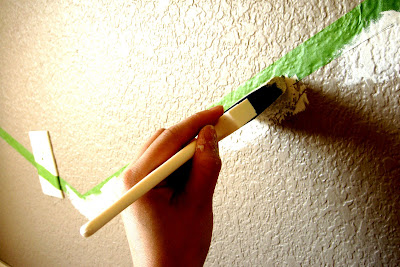
First, I did lots, and lots, and lots of reading on how to paint stripes on textured walls. The consensus, push that tape down hard with your finger to get in all the crevices. So I went out and invested in Frog Tape (since that also seemed to reign supreme in the painting community), picked up a couple of color samples, and rounded up the rest of my supplies for a weekend of chevron fun!
Step 1-Divide the wall in half with your first vertical line.
Tip: use a chalk line for your vertical lines if you don't want to hassle with peeling tape as you go during your horizontal striping process.
Step 2-Grab your laser level and get busy. I divided my two sides in half, then in half again. Each line will be a point in your chevron stripe.
My vertical stripes ended up being 17 1/2 inches apart and I decided to go with that same measurement for the width of the strips.
Step 3-Mark your points. Every other strip was marked every 17 1/2 inches, then the strips in between were started at 8 3/4 (half of 17 1/2) inches to start, then up every 17 1/2 inches so the lines stagger. Mark your first 2 lines, then use a laser level to mark the rest on down the wall. Here's my super technical laser level holder.
Now you're ready to start marking your zig zags! This was my favorite part because you really got to see it starting to come together!
Step 4-Connect the dots! Be consistent in your taping. Each time I taped I started my point on the right side of the tape, under my pencil mark. This is really, REALLY important so you don't end up with an uneven pattern.
Step 5-Because I didn't use chalk, darn hindsight, I had to pull up my vertical tape as I taped my chevron stripes.
Time to paint!
Step 6-Push down the edges of your tape where you'll be painting. This will get the tape sealed off in all the crevices.
Step 7-Use a sponge brush to create a seal around the edges. Then roll away!
Have plenty of time to paint so you can get your second coat on and pull up your tape before your paint dries! You'll reveal crisp, beautiful lines!
And the finished product:
One more BEFORE and PROGRESS
I'm still searching for the perfect chair for the space, but I stop and stare each time I walk past the room. The Mr. thinks I'm a weirdo, but I can't believe what paint can do! I'm excited to see we're making progress on this room!
I'll be linking to these fab linky parties this week! Check 'em out and find a new friend to add to your reader!


19 comments:
Very cute!
WOW! That wall came out gorgeous! Congrats on all the hard work.
Omg how fun! It turned out great! :)
That is fantastic! GREAT job!
wow looks great! nice job!
That looks lovely! You did a great job.
Looks SO good!!
That's just too cool. Nice job.
Love me some chevron and you did a beautiful job! Wow!
Very pretty! I love the contrast with the blue desk :)
Visiting from Serenity Now
Oh. My. Goodness. Gracious. That is so fabulous! And that bright blue desk looks gorgeous in front of it! I am pinning this and following you! You're awesome!
Fabulous job! Want to come over and do mine?
Thanks so much for sharing!
This looks so awesome - the colors of paint are great and you desk rocks! Love it! stopping by from Serenity Now.
I just LOVE your design style. Found you a couple weeks ago on Serenity Now and I've been following ever since. Love what you're doing with the office so far. and I think it's a FABULOUS idea to convert a formal dining room to an office. I'm all about practical ideas like that.
I love this - I love how thick the lines are - it really makes the room pop! Looks great!
~Jessa
www.jessajill.blogspot.com
This is awesome. Thanks for the easy to understand tutorial. I will be adding this to pinterest for when my hubs and I finally get a home!
That look great!
Love it.
By the way I`m your latest follower;)
Please come and visit my blog too,stay a while and maybe follow back;)
Lovely greetings from Germany...
http://pudel-design.blogspot.com/
Love this! Your textured wall certainly added a bit more of a challenge to this project. You've got to be thrilled with the end result.
Beautiful! I found you at A - Z. I am a new blogger and a new follower :-)
Post a Comment